Sharp RP-117 Linear Turntable

After seeing a video about the Sharp RP-117 turntable I just had to get one to play around with for myself.
I picked one up on Ebay in non-working condition. The price was a little steep for a "parts or repair" listing but I made a reasonable offer and the seller accepted.
The description of the turntable's condition was something the the effect that the player still actually played records if you held the drawer shut. It's a common fault on these that the drawer loading gear breaks. It's such a common problem that an Ebay seller who custom makes replacement gears has sold over 200 of them.
The player arrived before my replacement gear did, but I couldn't help myself and began disassembling the unit right away to assess it's condition.
The RP-117 can be a little tricky to get apart without breaking things. The service manual goes a little way to explaining how it all comes apart, but stops just short of making it easy. I'll add a tip later on that I think will help.
With the unit apart, I quickly found the loading gear, predictably split and non-operational. But I also found the tonearm belt to be almost completely hardened and immobile, and the platter drive belt had long since melted into a black putty-like substance. The upper stylus was dirty but seemed like it might be functional. The lower stylus was missing its diamond tip - it was essentially just a bare cantilever.
So I ordered new belts (a word on that later) and a pair of new styluses. Thankfully the styluses were a very very common type and there's still tons of NOS of them for pretty reasonable prices. If you're willing to wait a couple of weeks you can get them for as low as $13 apiece (well as of summer 2019 anyway).
The turntable was in such a state of disrepair, though, that it didn't seem possible that anyone had played a record on it recently. It certainly could not play a record if one held the drawer shut as the seller suggested. I reached out to the seller to ask for an explanation, but he doubled down on the story that he had played a record on it just prior to sending it out. Honestly though, there is just no way that the platter belt was working any time in the last year, it was completely stuck to the spindle and like I mentioned earlier was like black putty - no cohesion at all. For that to happen the belt would have to be stationary for a long time.
 |
| The drive belt was stuck to the platter and had basically disintegrated. |
Finding Replacement Belts
If you go searching around for advice on repairing one of these, you might stumble across a forum post from a few years back with a guy claiming to have fixed and sold several of these over the years. He'll warn you not to buy replacement belts from Ebay because the ones people are selling are actually too tight and will cause the motor to fail prematurely. However the company he recommends buying from no longer exists. He quotes the belt size as 21.4 inches, but then he goes on to say that part of his process is re-adjusting the turntable speed - and that's one of the things you'd need to do if you used the wrong belt.
 |
| From the RP-117 service manual |
Unfortunately, the service manual only provides a partial clue as the correct belt size - the original part number. There are a lot of places claiming to sell that part number, but as far as I can tell all of them are just using substitutions and there's no telling what reference they're using to determine the equivalent size. Although I acknowledge that the Internet can very often act like a huge echo chamber where one person says something that they're not quite sure about and the next person picks it up as fact and before you know it hearsay is indistinguishable from verifiable fact, the Internet does seem to agree that the original belt is actually exactly 20.0 inches.
This reference in particular was very convincing as it lists sizes for quite a few belts rather than just this particular one.
Specifically it lists the main drive belt "NBLTH0093AF00" as an "FR20.0" which as far as I can tell means "Flat Rubber" and "20.0 inches in diameter".
This site seems to corroborate that size:
This reference not only agrees with the drive belt size, but also lists the tonearm belt "NBLTK0235AF00" as an "SCX3.2" which seems to mean "Square Belt" "3.2 inches in diameter"
While I could have ordered the belts individually (and would if I had it to do over) I ended up buying a set from an Ebay seller from Portugal. The tonearm belt was an exact match, but the drive belt was 20.5 inches according to my flexible tape measure. It was close enough that I went ahead and used it anyway, and when I measured the rotation speed of the platter it was pretty much dead on 33 1/3 RPM.
Disassembly and Part Replacement
As I mentioned earlier, getting this thing apart isn't really straightforward. The service manual gives some advice on how to do it properly but in my opinion doesn't do a very good job of it.
General Disassembly Advice:
General Disassembly Advice:
- Have your camera handy and take pictures
- Take pictures of the screws next to where they came from as you take them out - there are about six or seven different types of screw involved.
- The first thing you should do after taking the cover off is to remove the styluses - it's very easy to bump and destroy the cantilevers while you've got your hands inside the unit manipulating things.
In order to replace the drive belt, you have to disassemble most of the loading tray. At one point the service manual tells you to pop the front bezel off and remove the tray, but if you follow the instructions exactly it'll still be a huge pain to get it out, and nearly impossible to get it back in.
In my opinion the step missing is the removal of cross-bar at the front of the player that supports the front bezel. Be careful, though, there's a spring loaded hinge mechanism - you'll want to take plenty of pictures and note how it is supposed to be connected so you can put it back properly when you're done.
 |
| If you're planning on removing the black platter/tray cover, do yourself a favor and remove this cross bar first. |
On the underside of the loading tray there are several plastic fasteners that have to be removed very carefully to prevent breaking them.
The procedure I used was:
1-2 Carefully slip a razor blade up under the lip of the retaining plug and gently pry it up
3-4 Do the same thing with the clip itself, taking care to pull it straight up

This process is a bit harder to reverse as the little legs of the plastic clips are now spread out. I found heating them up with hot air made them pliable enough to re-shape them. You could also boil them in water to achieve the same effect.
Now, it is technically possible to replace the belt without completely removing the tray cover, however trying to stick your hands in those small spaces and work the belt around can be frustrating and in my opinion just increases the chances of accidentally breaking something.
Also, if yours is anything like mine, the grease on the loading rail is probably hardened and sticky so it's probably best to go all the way and remove the whole loading tray. The service manual does not describe a procedure for doing this, but basically you have to remove the black tray cover which gives you access to the screw fastening a catch bar on the left rail.
If you want to remove the tray completely, you'll also need to unplug the ribbon cable that electrically connects it to the main PCB. Whatever you do, don't use any force! The ribbon cable only comes off at the main PCB side - simply push the plastic clips to either side forward (towards the ribbon) to unlock and the ribbon will just come right out.
 |
| Disconnect the ribbon cable before attempting to remove the loading tray. |
The loading tray has several small guides and fasteners. As you're removing it, make sure to take pictures of the orientation of all of them.
Once you have the loading tray out, it becomes marginally easier to replace the tonearm belt. As you can see in the images below it's recessed all the way in the back. I did not make any attempt to take apart the tonearm carriage. I just carefully worked the old belt off and the new one on with a pair of tweezers from this vantage.
 |
| The tonearm belt is really tricky to get at. |
The tonearms themselves have optical sensors for reading the gaps between tracks. Based on the service manual they reflect a light off the surface of the record and onto an optical sensor. The sensors on mine were almost completely clogged with dust, but it was nothing that good blast of pressurized air wouldn't fix. I noticed that the bottom tonearm actually had a plastic cover over its sensor and emitter (which is pretty smart considering that dust from the record surface is very likely to fall down into it), but the upper tonearm did not have a plastic cover. Initially I cut another clear plastic cover for it out of an old box protector, but this made it harder for the turntable to read the track boundaries so I ended up removing it.
After cleaning off and replacing all of the grease on the loading tray and the loading tray bearings and replacing the belts, I reassembled the player. The very last step was to install the new styluses.
The player actually has two access doors for cleaning the styluses, clearing debris away from the light sensors and replacing the styluses.
The player actually has two access doors for cleaning the styluses, clearing debris away from the light sensors and replacing the styluses.
Initially I couldn't figure out how to get the styluses off. I've never dealt with this style of cartridge before but everyone seems to just assume you know how to do it. I spent an embarassing amount of time searching around the Internet for some kind of instruction for this - including scouring the entire service manual to no avail. Turns out there are fairly good illustrated instructions in the user manual.

How Does It Perform?
So with repairs and maintenance out of the way I was able to check out this interesting piece of phonograph history.
Stackable
Since operating the turntable is completely horizontal there's no lid to lift making this thing incredibly convenient in terms of where it will fit in your Hi-Fi stack.
No Dedicated Ground Wire
If you have any experience with record players the first thing you're likely to notice that stands out about this one is that there is no ground wire. The instruction manual briefly addresses this advising you to flip the power cord the other way around if you experience an audio hum. This tells me that internally they've tied ground to the neutral pole. This isn't a huge deal but it's kind of a pedestrian design - there's a reason our house wiring has a separate neutral and ground. But thankfully this turns out not to matter that much - I certainly didn't detect any issues. Of course there's nothing stopping you from connecting a separate ground wire to your receiver except perhaps the inconvenience of having to find a screw on the bottom of the player to anchor it - the back of the player is all plastic.
RCA Cables Are Fixed
The next thing that says a little about the quality level of this player is the fact that it has fixed audio cables - that is to say that they're directly wired in rather than using RCA sockets. This, no doubt, saved Sharp a few pennies and some design headaches but it clearly illustrates that they were trying to build this thing on the cheap. The attached audio cables are barely three feet long. This is somewhat in contention with the convenience of being able to place it anywhere in your Hi-Fi stack. This made it difficult to use my receiver's built in Phono amp because the cords just wouldn't quite reach from the bottom of the pile. I wound up just using an external phono amp instead so it wasn't THAT big of a deal.
Loading Discs
Unlike a laserdisc player which also plays 12" discs, the loading tray only protracts about seven inches from the front of the player. This is mostly because the drive motor, spindle and about half of the circuitry in the player are actually contained within the loading tray. However it does make it a little challenging to insert a record without its surface scraping on either the top of the loading slot or the back of the loading tray.
Automatic Music Selection
My experience with this was kind of hit or miss. I made sure to thoroughly clean and inspect the optical emmitters/sensors on the tonearms, but it still seemed to have trouble with certain records - occasionally it wouldn't find any track breaks at all, but with other records it was perfect. The manual tries very hard to explain that it's not guaranteed to work even when the player is brand new. Oddly, though, the discs I thought it would have the most trouble with - the translucent/transparent ones - seemed to work perfectly most of the time.
A Little More On The Automatic Music Select
When you first insert a record you have the option to just hit "play" and it will simply drop your stylus at the beginning of the top side of the record. Alternatively if you press any of the number keys to select tracks, when you hit play the tonearm makes a quick pass across the record once to try to measure the track boundaries. Based on the service manual it seems that it does this by measuring how long it sees a full reflection of the light it's shining on the surface - effectively measuring the width of each of the visible "landings" on the record. There's a "L, M, H" switch on the loading tray for setting the "sensitivity" which is to say the duration that the light has to be fully reflected before it will decide that it's looking at the silence between tracks. The system was designed with the expectation that it wasn't always going to drop the stylus in exactly the right spot, so the muting circuit which normally just stops you from hearing the pop when the stylus drops in the lead-in groove is also used here to keep things quiet when the stylus drops a few seconds before the end of the previous track. It stays muted until the music dies down indicating the actual end of the track. This is why some track changes take several seconds longer than others.
Rotational Speed
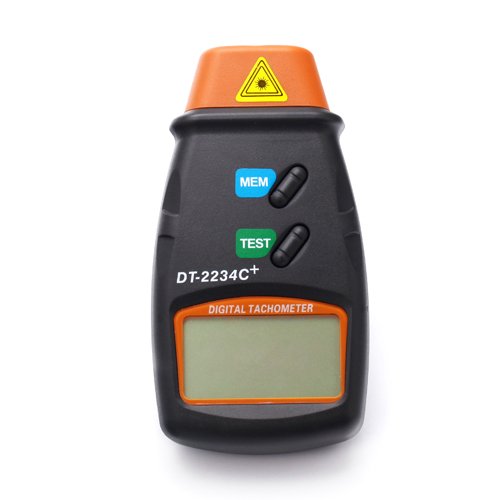
As I mentioned above, one of the fuzzy areas of this installation was the lack of a definitive size for the platter drive belt. Given the age of this turntable and the fact that it doesn't apparently use "quartz lock" to precisely control rotational speed, it's possible that it may not be rotating at exactly the correct speed. Since this is the only turntable I own which doesn't automatically lock in an accurate rotational speed, I had to see how this used to be checked in the olden days. This will be obvious for some readers but it was somewhat new territory for me. Evidently the older method was to us a strobe light and a specially printed disc (usually paper or thin cardboard) and try to get a series of dots or marks to appear to stand still (which meant they were in sync with the rate of the strobe). The more modern approach is to use "frikken lazer beams". There are plenty of sellers out there that will happily sell you a "specialized" device for accurately measuring the rotational speed of your turntable for the low low price of $175+, but it appears that all they've done is to re-brand an extremely inexpensive device and capitalize on the the fact that some vinyl enthusiasts are used to paying exorbitant prices for fairly simple devices. I found an inexpensive digital tachometer - pictured below - and for $13 I thought it was worth taking a chance on. Turns out it was perfectly up to the task and measured the turntable's speed at 33.3 RPM which is pretty spiffy considering it's age and the fact that the belt I used isn't exactly the right size.
How Does It Sound?
The design focus for the RP-117 was clearly convenience so this isn't an audiophile turntable. You're limited to the relatively cheap STY-133 cartridges, which is great in the sense that you don't have to take out a second mortgage to restore these to original function, but doesn't really leave room for upgrading the sound. To my ears the RP-117 is fairly competent - it doesn't seem to pick up as much surface noise as my other turntables so I know its missing a bit of detail in playback, but other than that it sounds great. The sound is less nuanced than my Technics SL-10 or my AT-LP1240 but never the less listen-able. If you're not looking for the purest of high-end vinyl experiences then this player is more than adequate, and in terms of convenience it's pretty tough to beat. Aside from longer seek times and hit-and-miss track detection it's pretty much equivalent to the convenience of a CD player - just put the disc in, and hit play (though you do have to push one additional button to program the player to play both sides because it doesn't do so by default.)
A Word of Caution
Whatever you do, NEVER put any pressure on the loading tray or try to push it inward. The mechanism is poorly designed in that it has an electric motor with a plastic gear connected directly to a plastic rail. Any force exerted puts stress directly on the gear and the teeth of that plastic rail. Modern loading trays generally have a belt and pulley between motor and the loading rail(s) - if a little too much force is exerted the belt can slip a little without damaging anything. There's no such buffer here. If you ever have to ship one of these, you should probably try to find a transport screw to lock the loading mechanism in place, or disassemble the player and temporarily remove the loading motor from its mount. Otherwise it will have a high probability of arriving damaged.
Conclusion
The RP-117 has been a pretty fun hobby project and is a pretty interesting piece for any retro hi-fi enthusiast. It wasn't what I would call cheap, but the price for one of these in need of repair can be pretty reasonable and it doesn't cost a whole lot to restore them to full function provided that you take your time and don't try to force anything. It sounds at least as good (and probably a tad better) than the the sub $100 turntables you'll find at big box and little music stores. Pair it with a decent phono amp and you've got a nice player that will not only be the most convenient option for vinyl you're like to ever find, but also a cool conversation piece when you're listening to music with guests.


Thank you!! Wealth of knowledge and information. Much appreciated.
ReplyDeleteHow can I contact you via email? I have a question maybe you can help me with....
ReplyDeleteThank you ,
ReplyDeleteWhen i replaced my gear i found 2 springs which fell off any idea where they go
ReplyDeleteHmm. The only springs I really remember were in the door hinge mechanism. Can you describe the springs?
Delete