Panasonic Q Belt and Fan Replacement

Some time in the early 00's (I want to say 2002) I was reading the magazine GameNow and came across an article about the Panasonic Q. I was really into import GameCube games and Japanese DVDs (they had Pokemon movies in widescreen without oversaturated colors!), so this seemed like a match made in heaven. Back then it was still kind of a pain in the butt to play out-of-region DVDs, and I didn't have a multi-region player yet.
The GN crew went on to say that they had bought a pre-modded unit from an outfit in New York called Upstate Games. The DVD player had been unlocked and would play any region DVDs, and the GameCube had a region mod installed which allowed switching between Japanese and US modes. That sounded like exactly what I was looking for so I found Upstate Games on the Internet and shot them an email. The price they quoted me for the silly thing was around $500. Not only was that a lot more money back then than it is now, I didn't have an income that would normally support such an extravagant expense. So what could I do? Well, my wife is just as much of a Japanophile as I am so I told her I wanted to get it for her for her birthday. She resisted, but eventually I won.
The particulars about how I paid were a little fuzzy, but I remember freaking out a little when I made payment and Upstate Games suddenly stopped replying to my emails. That was the most I'd ever paid for something over the Internet before. In my panic, I emailed the staff of GameNow asking how well they knew the folks at Upstate Games. They very graciously responded that they knew them very well and I shouldn't worry. Sure enough I got an email from Upstate Games the next day letting me know they had shipped the Q out.

Evidently the magnet on the spindle had some sort of chrome layer on top of the magnet which crumbled and came off. The magnet held it in place so what I was hearing was the spindle grinding these pieces against the clamp. Thankfully nothing important was scratched and I was able to clean all of the bits away. While the clamp still works normally with the spindle magnet missing its protective chrome cover, that chrome cover was there for a reason. It cost money to put there so the engineers would not have included it unless it served a function. My best guess is that it reduces friction, protects from oxidation and acts as a cushion for when the clamp snaps into place.

The clamp has a little guide pin in the middle that slots into the hole in the middle of the spindle, so I took a craft knife and carefully carved out the center of the vinyl sticker.
After a couple hours of testing it seemed to work without issue, so I'm calling that good for now.
2. Remove the four (4) steel screws from the left side panel.

3. Remove sixteen (16) black screws from the back panel. (All of these screws are the same type so there is no need to keep them separated.)


7b. With the rear of the top cover loosened, carefully pry outward on the tension clips holding it to the front panel while you gently lever it up. Only lever it up a couple of degrees - just enough to keep the clips from re-engaging.


6. With the plastic gears removed you can remove the old belt and place the new belt on. If you ordered an exact part you're basically done with this step. But since I was using a variety pack I had to figure out what belt was the best fit so there were a couple of extra steps. A belt that's too small will usually work but it's bad on the loading motor so I wanted to get one that was juuust right.
From the very day we got it the fan was the noisiest thing. It rattled very annoyingly and we could only tune it out so long before we had to shut it off and take a break from the noise. At one point I decided to buy a "quiet" PC fan that was roughly the same size thinking I could just swap it out. Given the expense and rarity of the system, though I did not want to try before I knew it was safe. When I searched the Internet for info about what the right fan was and how to replace it, the only reference I could find of someone trying to do this was a user on the now defunct Assembler Games forum who swapped it out for a seemingly matching fan only to find the system would not power up properly afterward - instead throwing an error message. There was never a resolution posted to that thread and no one else seemed interested in trying.
When I said I bought the Q for my wife, it was really true. It was hers and I didn't do anything with it that she didn't approve, and that included experimenting with fan replacements - especially after explaining the possibility it might damage the power supply if I did it incorrectly.
The Q was our main GameCube for about three of four years. When the Wii came out we kept the Q in service for another year or so just for Phantasy Star Online, but played everything else on the Wii. Eventually I boxed up the Q and put it in storage. I make a point to take devices with a disc tray out of storage every year or so to exercise the drive belt and hopefully keep it from hardening, but other than that they don't get used at all.
This year (2022) a couple of interesting things happened. In around April I took my Q out for it's yearly spin and found it to be in perfect working order, aside from the noisy fan. I was reminded of how annoying the noise was so I decided to look again to see if anyone had "solved" the fan replacement problem. At first all I could find was the same basic thread from nearly 20 years ago about getting an error code when trying a non-original fan, but then I found this Reddit thread from 2019. Someone claimed to have used the same silent PC fan to replace the OEM fans in three different Q's. The model was described as "Scythe SY501012M 50mm x 10mm Silent Mini Kaze fan" It was described as a near drop-in replacement with the only major problem being that the connector is wired for the wrong polarity for the Q. Unfortunately since the thread was three years old, I had to search pretty far and wide to find old stock of that exact fan, but as soon as I did, I snatched it up.
While this had been going on, I was also seeing rumblings from other Q owners that their drive rails were falling apart in spectacular ways. The popular wisdom making the rounds is that it's only a matter of time before your Q drive rails crumble - the plastic will get brittle and they'll just fall apart. The "rails" are the plastic sides of the DVD drive. The drive tray slides along grooves in these rails when the tray is loading or ejecting. While there have been 3D print models for replacement rails available for some time, some of the more reliable mod/repair folks were reporting that the rails available did not print or fit correctly. So another Q enthusiast (Dennis van den Broek) set out to craft a more reliable set of replacement rails.
When I looked at what was involved in tearing down the machine to get at the fan, I realized I was going to have to take the drive out. If the plastic is as brittle as it's rumored to be I figured there was a chance I might accidently break it getting the drive out. Rather than be stuck with a non-functional machine, I decided to wait until Dennis finished his newly designed 3D print replacements and have those on hand just in case before I got started. It turned out that I didn't need them (yet), but I'm glad to have them on standby.
Before We Get Started
As a rule I always test a console to make sure it's working before I open it up - that way if it doesn't work when I put it back together I have a better idea whether I might have done something to break it.
This morning when I fired up the Q to test a couple of games in it the drive didn't open the first time I hit the eject button - a sure sign that the belt is on its way out. I hit eject again and the drive opened normally, and it loaded a game normally when I first tried it. During the course of testing it out, I opened and closed the tray multiple times and at a certain point the loading mechanism started making a grinding noise. The noise was not rhythmic like the noise made when you're dealing with a dirty limit switch causing a gear to slip teeth, this was something else. After I got it apart I found the source of the grinding.
Not sure how long term this will be but as a band-aid style fix, I placed a 1/2" vinyl sticker that was left over from an earlier project onto the spindle magnet. It looks like a perfect fit. The vinyl sticker has a very thin but strong adhesive so I'm not worried about it leaching out over the spindle over time, and it should provide some cushion for when the clamp snaps into place.
The clamp has a little guide pin in the middle that slots into the hole in the middle of the spindle, so I took a craft knife and carefully carved out the center of the vinyl sticker.
After a couple hours of testing it seemed to work without issue, so I'm calling that good for now.
Repair Log
In this repair log, I'm going to take you through the steps to replace the drive belt, and the fan.
The fan used is a "Scythe SY501012M 50mm x 10mm Silent Mini Kaze "
If you hurry you may still be able to buy one from Quiet PC USA.
The drive belt I used was from a variety pack I bought on Amazon, but you can alternatively order the exact replacement part from Console5.
The fan cable runs underneath the DVD drive to the opposite side of the Q so the steps for replacing the fan and the drive belt are the same up to a certain point.
Disassembly Part 1: Getting The DVD Drive Out
1. Remove the four (4) steel screws from the right side panel.
 |


4. Lift up and on the left and right side panels to remove them. Set the side panels aside.
5. Turn the Q on its side and remove the two (2) black screws under the front panel. (These are the same as the screws taken from the back panel.)

6. Turn the Q back upright, then unplug the three connectors on the left side.

7a. There are three tension clips holding the top cover in place, and the front edge of the top cover fits into a slot. To remove the top cover, carefully pull out on the back lip of the top cover then lift up slightly until you feel the clip let go.
7b. With the rear of the top cover loosened, carefully pry outward on the tension clips holding it to the front panel while you gently lever it up. Only lever it up a couple of degrees - just enough to keep the clips from re-engaging.
7c. While holding the top panel at a slight angle as pictured above, grab the front of the top panel and wiggle while pulling straight up - this should allow it to disengage the front lip and free the panel. There are are still wires attached so do not try to pull the panel off yet.
8. With the top panel loose, tilt it towards the right side to get access to the two plug connectors and the ribbon cable.

9. Disconnect the plugs and the ribbon cable from the top panel by pulling them out.

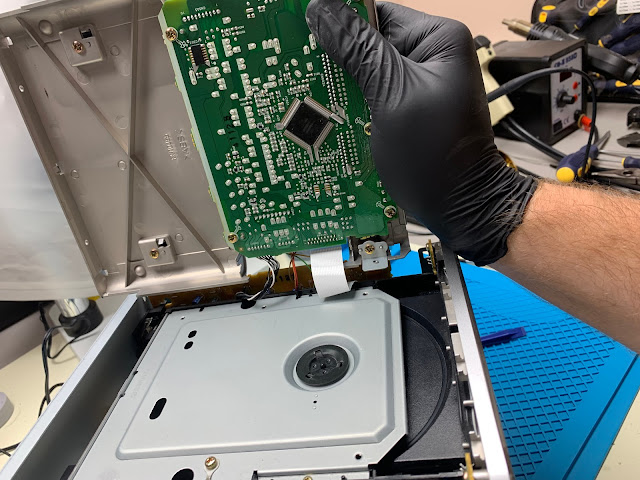
10. Remove the black screw from the front left of the DVD drive frame. (Ignore the chip and the blue wires - you probably won't have those. They're part of the region mod that was installed in mine.)

11. Remove the black screw from the front right of the DVD drive frame

12. Loosen the front panel by prying out where the plastic bottom is held by the metal clips attached to the front. Do not remove the ribbon cable from the bottom of the front panel. Instead just lay the front panel down in front of the unit with the ribbon still attached.
(Now, technically, with the front panel removed, you can perform all the necessary steps to replace the drive belt without needing to take the drive all the way out because the front panel is the last thing keeping you from pulling the disc tray out of the way. I don't recommend this, however because the front panel was the only thing holding the front of the drive up and it just seems like a bad idea to work on it with the drive just floating there.)
13. With the front panel removed, lift up on the rear part of the DVD drive frame to lift it out of the slots holding it to the rear panel, then tilt the drive forward along the front edge to expose four (4) ribbon cables.

14. Detach the three white ribbon cables (they're pressure fit so just pull them out of their sockets) and lay the drive upside-down on top of the front panel.

15. Remove the black screw from the PCB attached to the silver ribbon. This screw has finer threads than all of the other black screws so keep it separated from the others. Pull up on the connector to free the drive from the chassis.
With the drive free, you can now change out the loading belt. If you're not going to change the belt, you can skip the next section.
Replacing The Loading Belt
1. With the drive removed from the Q, turn it upright and detach the top panel by removing the two (2) small brass screws. It's also a good idea to remove the grounding cable screw and detach the ground cable from the top.
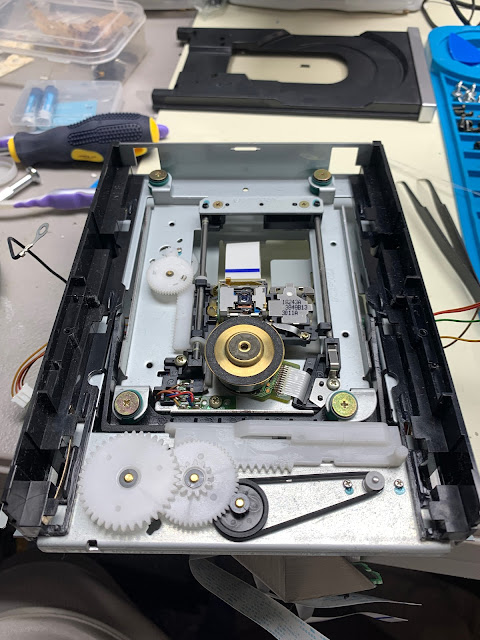
2. Lever the top of the drive up. The clamp in the middle of the top of the drive will be magnetically held to the drive spindle - just pull it up. It shouldn't require a lot of force.
3. Getting the drive tray open is easy to do but kind of tricky to describe. Look into the gap underneath the front of the tray and you should be able to see the white gears. Using a small flathead screwdriver, very gently start turning the gear. As you do this you should see the spindle and laser transport in the center of the drive start to lower.
4. Once the spindle has lowered all the way you should be able to pull the tray forward. Just pull it all the way out. You should now see two white cogs and the two pulleys holding the belt.

5. Remove the plastic C-clips holding the gears in place and remove the gears. You'll need to remove the C-clip from the big pulley to get the middle gear off, though you do not need to remove the pulley itself. The method I used was to push the blade of a small flathead screwdriver into the opening on the C-clip and twist to lift the edge of the clip then grab it with a pair of tweezers and pull it off.

6a. The old belt will want to hold the shape of the pulley so it might not cooperate when you're trying to compare it to other belts. What I did to deal with this was just place the belt on a glass bottle with a gradual taper to force it to hold a circular shape. The important thing is not to stretch it out when you do this, just push it down far enough that it stays circular.

6b. Next just try different belts until you find one that sits just a teeny bit above the old one. The one in the image below was just perfect.

7. With the new belt installed, you'll need to put the plastic gears back in place and attach the C-clamps. The way I like to do this is to find a small socket that just barely fits over the shaft, place the C-clamp over the shaft and use the socket to push it down. It should just snap into place without a fuss.

If just replacing the belt you can just reverse the previous steps to reassemble the Q and you're done.
Disassembly Part 2: Getting To The Fan Cable
Once you've removed the drive, you technically already have access to the fan cable, however, there's not much room to maneuver with all of those other cables in the way. In the interest of not breaking anything with a shortcut, let's disassemble a couple more things to give us some space to work.

1. Lift up on the "Digital AV" port to free it from the tabs holding it onto the back panel.
2. Remove the rear panel by pulling out on the plastic lip holding the metal tabs in place on both sides at the bottom. (If you forgot to remove any screws from the back, this is where you're going to find out)

3. Disconnect the large power plug from the bottom of the power PCB as shown below.

4. Find the two white posts holding the green power PCB in place and pinch the flare tops together until the power PCB is freed. Pull up gently, but don't attempt to remove the power PCB from the chassis. At this point the large vertical PCB is only held in place by gravity and tension from cables plugged into it, it will kind of float so you can move it around if needed to get extra space.

5. Open up the white cable management clip and pull out all of the wires sitting on top of the red and black fan cable wire. Then pull out the red and black fan cable wires.

6. You should now have enough room to safely pull the fan cable out of the vertical PCB. If necessary, lift the vertical PCB up out of the chassis to give you more space.

7. Free the fan shroud and fan by removing two (2) black screws. (These are the same as the other black screws).

8. Remove the fan from the shroud by removing the two (2) brass screws from the back.

The fan has now been completely removed from the Q and is ready for replacement.
Replacing The Fan

As mentioned above, the "Mini-Kaze" fan is almost a drop-in replacement for the OEM fan - it even comes with the same exact plug connector. The problem is that it's wired backwards.
Interesting thing I learned on this project - case fans aren't simple DC motors where the wires go directly to the commutator. If they were, the only thing reversed polarity would do would be to cause the fan to spin backwards. Even the simple two-wire fans have additional circuitry that does not take kindly to being wired with reverse polarity.
 |
| The OEM fan plug on the right has power and ground in the opposite position from the new fan's plug on the left. |
To prep the replacement fan I needed to swap the wires going to its plug. I also took that opportunity to shorten the new fan's cable so it was closer to the same length as the OEM fan's cable.

Then I discovered there was one more problem with the replacement fan. The screw holes in the corners were slightly wider than those of the original fan. What this meant was that when I installed the new fan it was slightly loose even with the screws fully tightened. The OEM fan seemed to have some kind of plastic sleeve inserted to constrict the screw holes, but I couldn't remove it.
To make the screws snug in the replacement fan's screw holes, I wrapped the screws in some non-adhesive thread-sealer tape (the kind you use when installing a shower head or other water-carrying pipe).

When I wrapped the screw and then twisted it into the screw holes on the fan, the tape actually took the shape of the hole and held the screw snug.
 |
| The thread tape actually conformed to the shape of the screw hole and held the fan snugly. I removed this one to take a pic of it and show you. |
Before and After
Here is a clip of the noisy OEM fan. Can you imagine putting up with this for hours at a time?
Here is a clip of the Q with the new fan installed. Much better.


Comments
Post a Comment