The SNES Edge Enhancer - Is This As Good As It Gets?
The Super Nintendo Entertainment System (SNES) is the greatest video game console to ever bless the Earth with its presence. The fact that it is also my favorite console is simply a happy coincidence. Has this 1990 hardware achieved it's final, most "Super" form in 2025?
 |
| The SNES Edge Enhancer installed. A gray epoxy covers the chips, ostensibly to discourage counterfeiters. |
The SNES has always had blurry graphics, but it's not necessarily obvious until you see what it's actually capable of. Software emulators in the late 90's were probably my first glimpse into this possibility because they bypassed all of that messy hardware to directly render pixels on a high-resolution computer screen, whereas the the original hardware was mostly seen through the inherent degradation of the RF or Composite video connections of the CRT TVs of its era. It was easy to mistake the blurriness as an artifact of that rather than the design flaw of the video circuitry that it actually was.
Over the last couple of decades, the layers of video distortion between my Super NES and my eyeballs have been peeled back a piece at a time, starting with my first S-Video TV in 2003.
Around 2012 I discovered that with the right video cable and format converter I could get beautiful, bright and clear RGB video and play my favorite games on my 36" Sony Wega CRT in better quality than I had dreamed was possible.
In 2018 I learned about the leap in visual clarity possible when you modify one of the later "1-Chip" SNES revisions (which I wrote about here). The short version of the story is that I hunted down a SNES 1-Chip console, bought a SNES RGB kit from Voultar, and leveled up my SNES experience as far as I thought it could ever go in the analog realm.
The only real nit-pick I had with my RGB modded 1-Chip console is the fact that Nintendo made some mistakes when they were shrinking the component count to reduce costs. The CPU works differently enough that it produces glitches in certain games. In fact, it's different enough from the original console design that when the heated debate raged about whether FPGA consoles were technically "emulation", the SNES 1-Chip was cited as an example of first-party hardware emulation since it was not running the exact same instructions in the exact same way as the original SNES did. In short, while it offered the best video output possible from original hardware (after modification), the 1-Chip represented a compromise.
For a good number of years there was loose consensus that the original SNES video processing design flaws, particularly the ones responsible for the blurriness, were not fixable - at least not easily. If the pre-1-Chip consoles were ever going to not be blurry, it was going to take a lot more than a simple RGB bypass. There were prior attempts and theories floated about how this might be fixed, but nothing that could equal the quality of a modded 1-Chip, and nothing that materialized as a solution you could actually buy and install. Until April of 2025, that is. Enter the "Edge Enhancer"; a passion project by Voultar (the same guy I bought my 1-Chip RGB mod from in 2018). Seemingly fueled by dark magic it makes possible the ultimate form of the original SNES hardware.
What Does It Do, Exactly?
 |
| These side by side shots of Princess Peach from Super Mario RPG illustrate the dramatic difference this upgrade makes. It brings out actual detail rather than adding artificial "sharpness". The camera settings, room lighting and every other condition were kept as identical as possible (Photo credit to my wife, Lyla) |
 |
| Beam Software logo from Super Smash TV pre-upgrade (you may need to click on the full size image to see the image without compression artifacts from Blogger) |
 | ||
| Beam Software logo after the upgrade - not only is the logo clearer, but the white background is slightly brighter as well. |
If the Beam Software logo example wasn't dramatic enough, check out what happened to the "PRESS START TO PLAY" player 2 prompt.
 |
| Notice how the vertical lines of the letters appear a little too skinny against the black before the upgrade |
 |
| After the upgrade the vertical lines of the letters have the same thickness as the horizontal ones. |
This "transition to black" issue looks really similar to the the one on the ColecoVision fixed by the TMS-RGB mod. You can find a write-up and screenshots here.
Buying
Installing
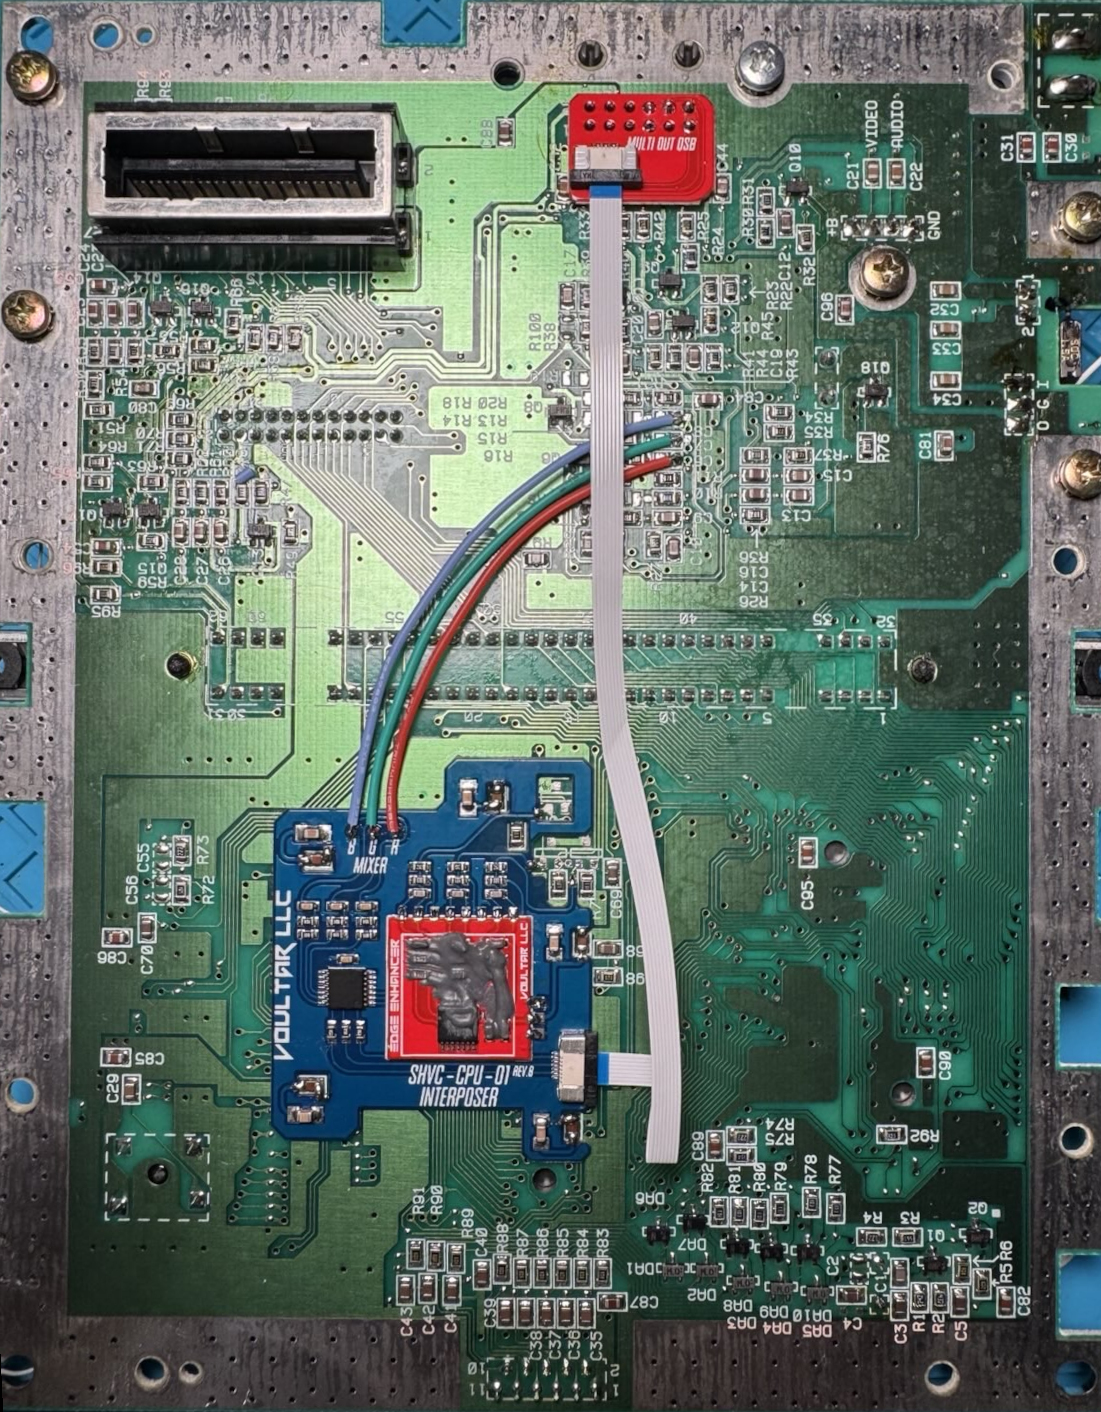 |
| This is one of the cleanest installations I've ever seen. |
- The gray epoxy kind of interrupts the clean look of the mod. It's on the underside of the board, and aside from taking pictures of the install the only way you'll ever see it is if you use a clear shell for your console and insist on turning it upside down to ogle your work. If it wasn't likely cost prohibitive I would suggest doing something like Watermelon did when they wanted to hide the Paprium chips - put a metal lid over it with a cool "Voultar" logo.
- The ribbon cable was not shipped flat so it arrived with a small kink in the middle. This prevented the ribbon cable from laying flat on the board after it was installed. Functionally this doesn't matter at all, it just made it harder to take a pretty picture:)
- Some of the solder areas of the interposer and the multi-out quick-solder board did not want to take solder. It was as though they had a thin varnish coating (kind of like some PS2 motherboards). It was bad enough that when I wicked away the solder from a couple of them that the pads were still yellow. Hitting them with a fiberglass pen took care of it, though and they took solder fine after that. The strange thing was that some of the pads took solder just fine without the need of the fiber pen.


Comments
Post a Comment